For a 100-person indoor room, plan on roughly 500 to 1,000 watts RMS, using about 5 to 10 watts per person; outdoors, you may need double or triple that power. A band normally needs microphones, a mixer, powered speakers or amplifiers, audience mains, and performer monitors, with the exact package determined by the room and the loudest instrument.
The usual problem isn't finding a list of equipment. It's arriving at a wedding venue with a Bluetooth speaker, one vocal microphone, and no workable way for the drummer or guitarist to hear the singer. The room may already have a PA, but its inputs, monitor coverage, speaker placement, and wireless frequencies may not suit a live band.
A dependable setup starts with the signal chain, then matches the system to the venue, stage plot, channel count, and monitoring plan. That approach prevents the familiar gig-night failures: feedback during the first dance, vocals buried under guitar amps, and a band that can't hear the count-in.
Table of Contents
- Understanding the Core Parts of a Live Band Sound System
- Choosing the Right Gear by Band Size and Venue Type
- Sizing Your Mix Around the Room and the Performance
- Building a Reliable Band Stage Plot and Mic Plan
- Handling Venue Sound Options and Wireless Mic Planning
- Final Setup Checklist and Common Band Sound Mistakes
Understanding the Core Parts of a Live Band Sound System
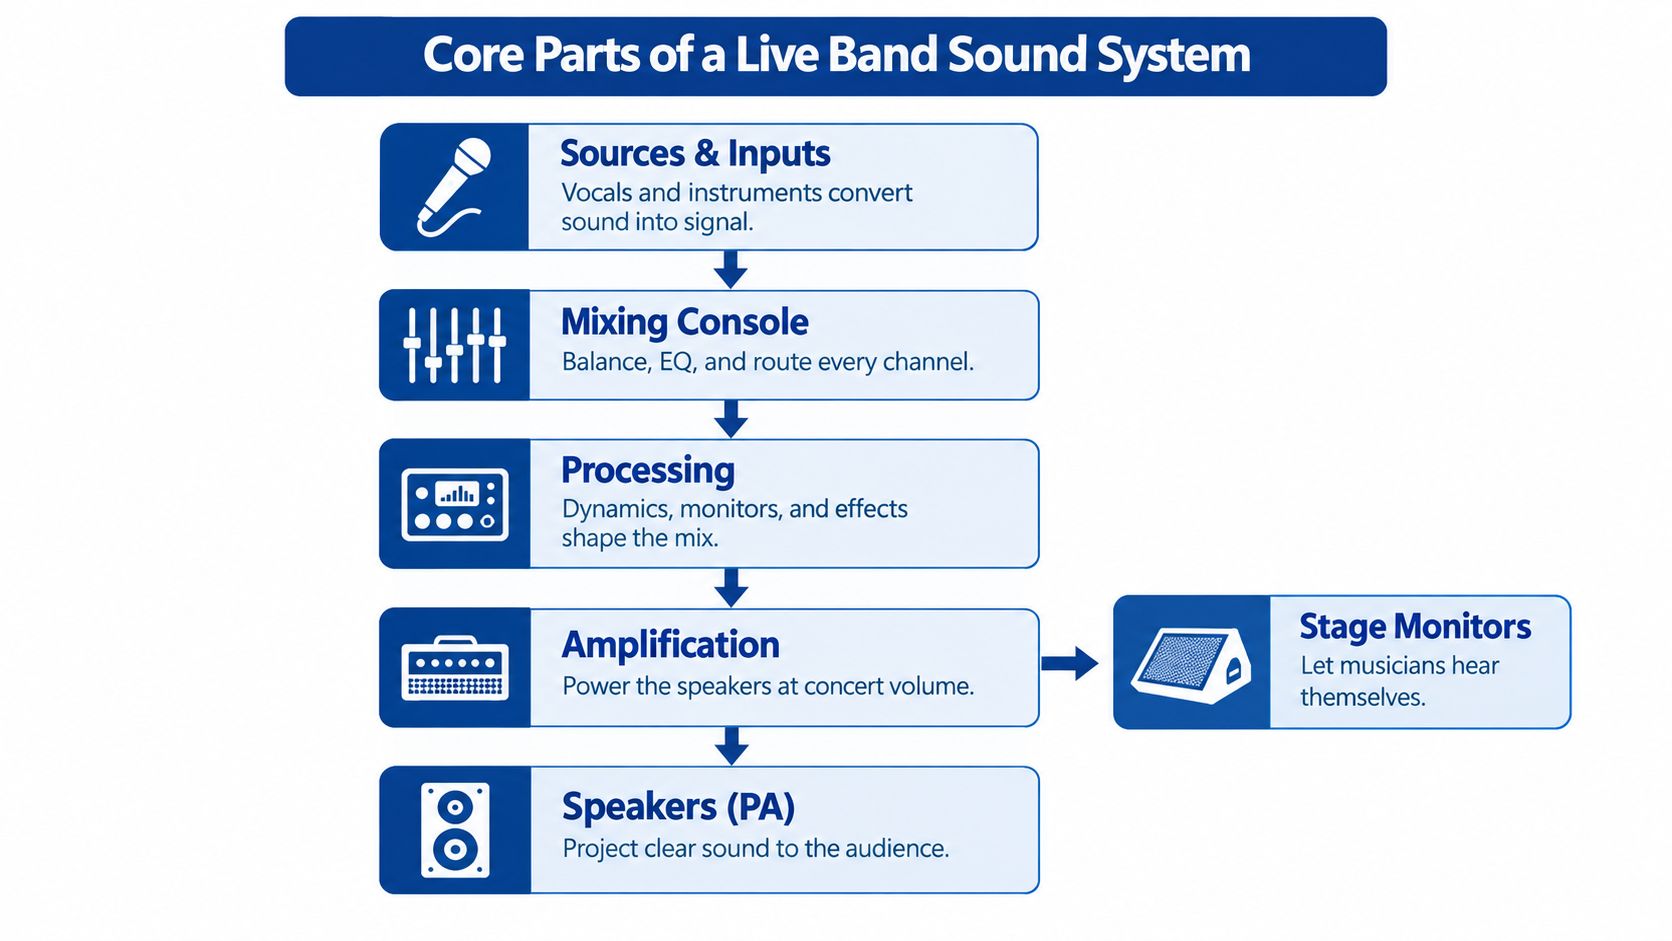
Every live band PA follows four practical pillars: input transducers, signal processing, amplification, and loudspeakers. In working terms, microphones and direct boxes capture sound, the mixer and processing shape and route it, amplifiers increase the signal, and speakers turn it back into sound for people in the room. This chain is easier to troubleshoot than a pile of disconnected boxes because each failure has a place.
Start with sources and inputs
The input stage includes vocal microphones, drum microphones, instrument microphones, and DI boxes. A DI box sends a clean, balanced signal from a keyboard, acoustic guitar, bass, or playback device to the console. That matters on a long stage run, where a balanced connection is less vulnerable to noise than an improvised unbalanced cable.
The mixing console gives the operator control over channel level, EQ, routing, and monitor sends. You don't need the most elaborate console available, but you do need enough inputs for the actual band, spare capacity for announcements, and enough AUX outputs for the monitor plan.
Processing may be built into the console or supplied by separate devices. It can include EQ, compression, reverb, monitor routing, and feedback management. Processing should improve clarity, not disguise a badly placed speaker or an overpowered guitar amplifier.
Practical rule: Fix placement and stage volume before reaching for more processing. A mixer can't rescue a microphone aimed at a monitor.
Separate the audience mix from the stage mix
The main speakers face the audience. Monitors face the performers. These are different jobs, and major live-sound guidance treats them as separate PA roles because musicians need a controlled reference mix while the audience needs coverage and balance.
That means a small band usually needs at least two output paths, not one speaker pointed vaguely toward the room. A left and right main arrangement can cover the audience, while wedge monitors or in-ear systems provide the stage feed. If the band uses substantial bass or kick drum, subwoofers may be added below the mains to handle low-frequency reinforcement.
Historical live-sound development reflects the same practical progression. Harman's history of live sound describes early-1960s PA systems that were often used mainly for vocals, a 1,000-watt touring PA described by 1967, and larger multi-way systems appearing by the 1970s. Modern equipment grew more complex because full-band sound requires clarity, headroom, coverage, and monitoring.
If the band is also producing promotional material, a clean live feed can support rehearsal clips and visual content. Tools such as AI video tools for song releases can help turn those assets into release-ready videos, but they don't replace a properly balanced room mix. For event-specific planning, compare the practical requirements in this band and event sound system guide.
Choosing the Right Gear by Band Size and Venue Type
The right PA depends on the band, room, and arrangement, not the number of people standing on stage. A quiet acoustic trio may send vocals and a few instruments through a compact powered system. A full rock band with acoustic drums, loud guitar amplifiers, and bass needs more headroom, low-end support, and monitor control.
The following ranges provide a starting point from live-sound buying guidance. They aren't a substitute for checking the venue, but they prevent the most common mistake, buying a system that reaches its limit before the band reaches performance volume.
| Band size and genre | Indoor wattage range | Outdoor wattage range | Typical speaker class |
|---|---|---|---|
| Small acoustic act | 300 to 800 watts | Higher capacity required as sound disperses | Powered two-way tops, commonly 8 to 12 inches |
| Medium full rock band | 1,000 to 2,000 watts | Substantially more power and coverage | Larger powered tops with subwoofer support |
| Large band or large room | 5,000+ watts | System design and coverage become critical | High-output mains, subwoofers, or line-array approach |
These ranges come from the American Musical live-sound buying guide, which also recommends sizing from the loudest unamplified source, then adding vocal and drum requirements before checking clean SPL and distortion. A compact powered PA can work well for an acoustic act, especially when the guitar or keyboard is DI'd and the room is controlled.
Indoor and outdoor rooms behave differently
For indoor events, a practical planning rule is 5 to 10 watts per person, or approximately 500 to 1,000 watts RMS for 100 people. The event sound system guidance from Imagina notes that outdoor requirements may double or triple because sound disperses more quickly without room boundaries.
Don't interpret that as a reason to buy the biggest boxes available. Excessive capacity can create transport, power, and placement problems. The better choice is enough clean headroom for peaks, with speakers positioned to cover the audience evenly.
Avoid the monitor compensation trap
Undersizing the mains and then turning up the wedges is a costly workaround. It raises the amount of sound on stage, increases the chance of feedback, and leaves less clean headroom for vocals and snare hits. A singer who asks for more vocal in the monitor may be telling you the main PA is struggling or the stage is too loud.
For unusual band presentation, percussion visual design can matter as well as audio. A source such as custom printed marching drum heads is relevant when a marching or parade-style setup forms part of the event presentation, but it doesn't change the need to place and mic the instrument correctly.
Sizing Your Mix Around the Room and the Performance
A band name doesn't tell you how many channels or monitor mixes you need. The arrangement does. A trio with two vocalists, acoustic guitar, electric bass, and a cajón has a different console requirement from a five-piece cover band with a full drum kit, keyboards, two guitar amplifiers, and several vocalists.
Start by asking what the PA must carry. In many small performances, the mains handle vocals and a few DI'd sources while guitar, bass, or keyboard amplifiers provide some of the instrument sound directly. That can reduce channel demand, but it also means amp placement becomes part of the mix. An amplifier pointed at the singer's knees won't produce the same balance as one raised or angled toward the audience.
Build the input list before buying equipment
Write the input list in performance order rather than guessing from a product package:
- Vocals: One channel for each singer, plus a spare microphone and cable if the event is important.
- Drums: Kick, snare, toms, and overhead channels when the kit needs reinforcement.
- Direct sources: DI boxes for acoustic instruments, bass, keyboards, and playback devices.
- Amplifiers: Microphone or line inputs only when the room requires those instruments in the mains.
- Event inputs: Space for an officiant, MC, DJ handoff, or ceremony playback if the band is serving a wedding.
The number of monitor mixes should follow the people who need different information. A drummer may need count, bass, and vocals. A singer may need their own voice and the main melody. A guitarist may need less of their own amplifier and more vocal. One shared wedge mix can function for a compact act, but it often becomes a compromise as the stage grows.
Use the loudest source as the design test
The Sweetwater PA setup guidance emphasizes matching the system to the actual performance rather than building an oversized generic list. Begin with the largest unamplified source, often the drum kit or acoustic piano, then add vocals and direct instruments. Check whether the mains remain clear when the band reaches its loudest section.
House sound changes the decision. Ask whether the venue supplies the console, mains, subs, monitors, microphones, stands, and an operator, or only a pair of speakers. A venue's phrase “PA included” may describe a speech system rather than a full-band system.
Bluetooth is useful for background music, ceremony playback, or a break playlist. It isn't a substitute for a wired band input plan. Pairing can fail, a phone can receive a notification, and Bluetooth latency can make monitoring uncomfortable. Keep a wired playback connection and a responsible playback device available.
Building a Reliable Band Stage Plot and Mic Plan
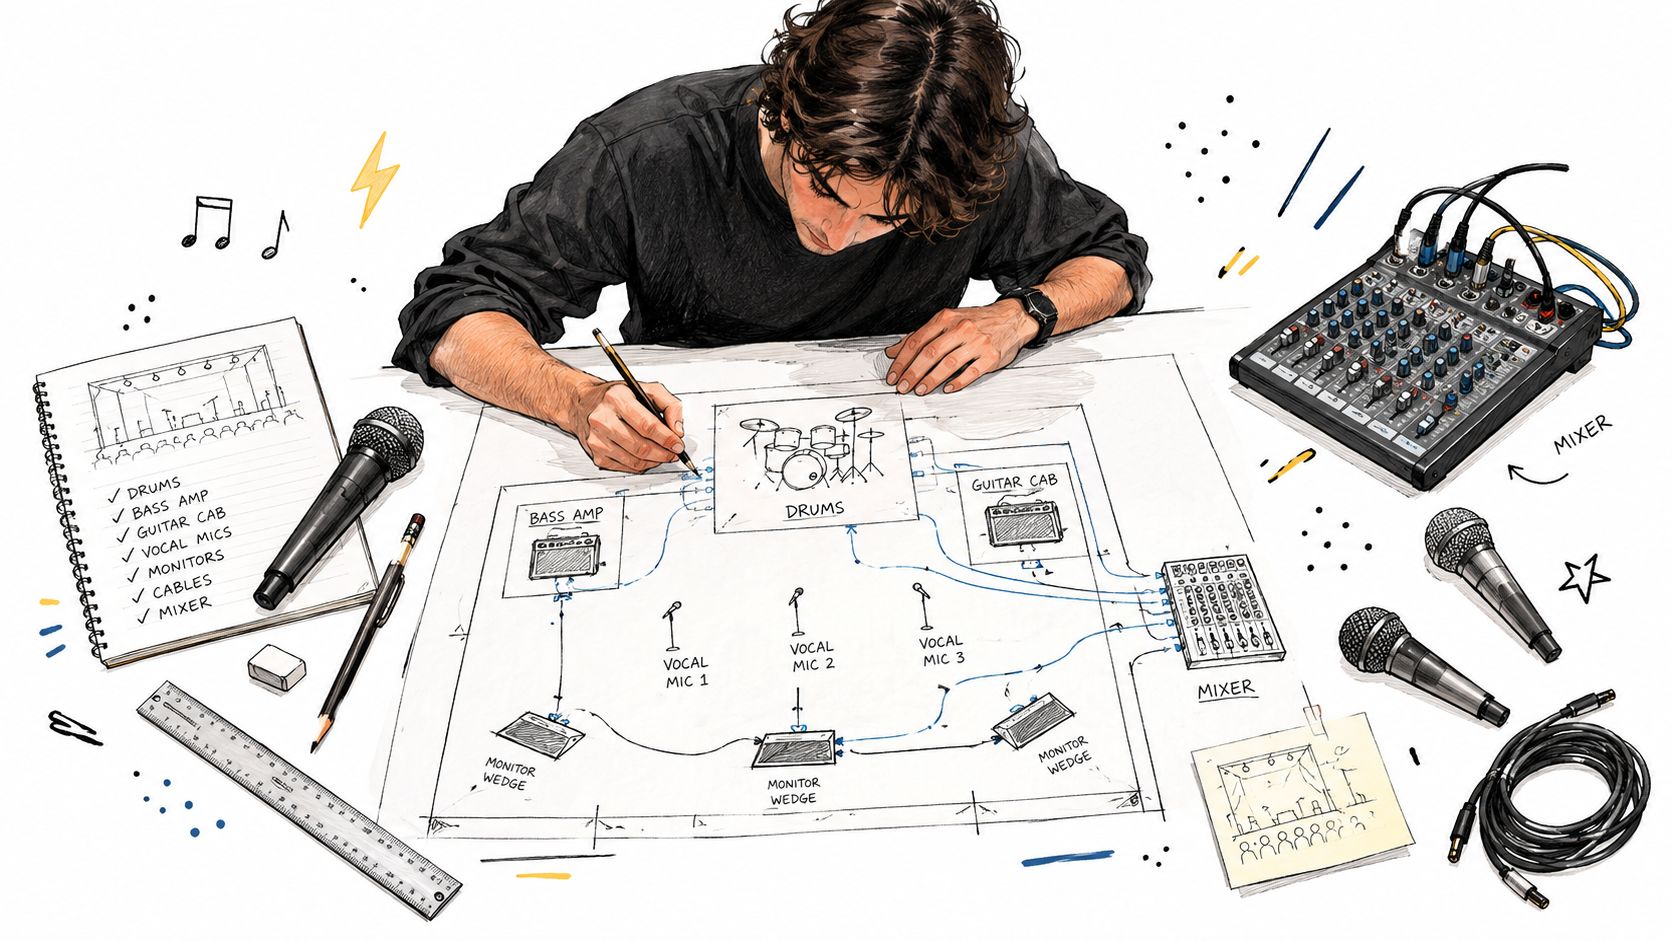
A stage plot saves more time than another piece of equipment. It tells the venue where each performer stands, where power is needed, which instruments need microphones or DI boxes, and what each monitor should contain. Send it before the event, then bring a printed copy with the input list.
Place the left and right mains ahead of the stage, aimed over the audience rather than across the microphones. Put subwoofers on the floor when the system uses them. Wedges belong near each performer, angled toward the correct microphone pickup area, not randomly along the front edge.
Draw the stage from the audience perspective
A useful plot includes the audience-facing view, performer names, instrument positions, monitor numbers, power points, and cable paths. Mark stage left and stage right clearly, because those labels are defined from the performer's perspective and can cause confusion during load-in.
For a typical wedding band, place the drum kit toward the rear, bass and guitar amplifiers to either side, keyboards where the player can see the bandleader, and lead vocals at the front. Keep the mains in front of all microphones. If a speaker must move, change its angle or height rather than pointing it directly at a vocal mic.
Match microphones to sources
A practical baseline for a full band includes one vocal microphone per singer, dedicated microphones for kick, snare, toms, and overheads, and DI boxes for direct instruments. Cardioid or hyper-cardioid microphones help reject spill, but their rear rejection only works when the monitor sits in the correct null area for that microphone.
Create an input list that the engineer can follow:
- Channel 1 onward: Label every vocal, drum, DI, and amplifier input.
- Mic details: Note whether each source needs a dynamic microphone, condenser, clip-on, or DI.
- Monitor assignments: State who needs each wedge or in-ear mix.
- Power and access: Mark outlets, keyboard power, pedalboards, and cable crossings.
- Special moments: Identify ceremony microphones, speeches, playback, and announcements.
Build monitor mixes deliberately
Separate AUX sends allow different performers to hear different mixes. That is more useful than feeding every wedge the same full-band signal, which increases stage clutter and can encourage everyone to request more volume.
Stage plot rule: If the microphone can see the monitor or main speaker, expect feedback problems before you expect clarity.
Use a soundcheck to establish gain before adding effects. Bring up each microphone, listen for noise, confirm the performer hears the necessary sources, and test the loudest song section. Don't point directional microphones toward PA or monitor speakers. That misalignment reduces gain before feedback and makes vocals harder to understand.
Handling Venue Sound Options and Wireless Mic Planning
Bringing a full PA isn't always the sensible choice. A venue may already have mains, monitors, stands, microphones, a mixer, and power distribution installed. In that case, the band should obtain an equipment list and input schedule before assuming the house system can carry drums, bass, guitars, vocals, and announcements.
Ask specific questions:
- Coverage: Are the speakers intended for speech, background music, or full-band reinforcement?
- Inputs: How many usable mixer channels are available, and are DI boxes supplied?
- Monitoring: Are wedges or in-ears included, and how many independent mixes can the console provide?
- Placement: Can mains be positioned ahead of the microphones, with suitable power points nearby?
- Operation: Is a sound engineer included, or must the band operate the mixer?
- Playback: Is Bluetooth available, and is there also a wired input for backup?
- Outdoor use: Does the outdoor area have separate power, speaker coverage, and weather protection?
A venue-provided Bluetooth PA can be perfectly adequate for a playlist or ceremony music. Live musicians need predictable routing, low-latency monitoring, and a way to connect every source without relying on a consumer pairing process. Test the exact phone, cable, microphone, and speaker combination before guests arrive. For practical wireless microphone handling, use this wireless microphone setup walkthrough.
Treat wireless microphones as a coordination task
Wireless planning is more than buying a handheld microphone. In the United States, FCC rules make 617 to 652 MHz and 663 to 698 MHz unavailable for wireless microphone operation after the 600 MHz transition, as summarized in current wireless microphone market guidance. A microphone that worked at an older venue may not be legal or reliable at another location.
Newer systems increasingly use digital transmission, rechargeable batteries, and app-based RF monitoring. Those features can simplify frequency checks, but they don't remove the need to coordinate frequencies with the venue, DJ, production company, and other wireless users.
Carry a wired vocal microphone and spare cables even when the venue supplies wireless units. Batteries fail, receivers lose signal, and crowded event spaces create interference. For a wedding band, the backup should cover the announcement microphone and at least one essential vocal position, not sit in an unopened case.
Texas Old Town is one example of a venue supplying indoor and outdoor PA systems with Bluetooth hookup and a wireless microphone, so a band should still confirm how those facilities map to its input list and monitor needs before the event.
Final Setup Checklist and Common Band Sound Mistakes
A good soundcheck is a sequence, not a volume contest. Walk the room before placing speakers, confirm the stage plot, and verify that the system supplied by the venue matches the band's actual inputs.
Use this final check before doors open:
- Speaker position: Put mains ahead of the microphones and aim them at the audience coverage area.
- Low end: Confirm subwoofers, if used, are on the floor and receiving the intended bass and kick feed.
- Microphones: Check each vocal, drum, and instrument microphone for signal, polarity, and sensible gain.
- DI routing: Verify acoustic instruments, bass, keyboards, and playback devices reach the correct channels.
- Monitor mixes: Ask each performer what they need, then keep unnecessary sources out of each wedge.
- Feedback check: Test the loudest vocal and band passage before guests enter.
- Wireless: Confirm legal frequencies, fresh batteries, receiver placement, and a wired backup.
- Venue logistics: Check power points, cable crossings, indoor or outdoor coverage, and the room's reflective surfaces.
The worst beginner mistake is treating every problem as a request for more volume. A singer who can't hear may need less guitar in the wedge, a monitor moved off-axis, or the main speaker repositioned. A muddy room may need lower stage volume and less low-mid energy, not another subwoofer.
Don't assume one monitor mix suits everyone. Don't rely on Bluetooth as the only playback route. Don't wait until the first dance to discover that the venue's speech PA has no drum inputs. A concise final event walkthrough checklist helps the bandleader and venue manager confirm these details while there's still time to fix them.
The most reliable choice is the smallest system that provides clean headroom, clear vocals, proper coverage, and the monitor control the performers really need. If the venue can't confirm those points, bring the missing equipment or hire an engineer rather than hoping the room will solve the problem.
For a wedding or special event, Texas Old Town offers indoor and outdoor event spaces with PA systems, Bluetooth hookup, and a wireless microphone, alongside on-site event support. Visit the venue to compare the room, stage layout, power access, and sound requirements before booking your band setup.